
🦎 Get your Openserve Fibre line installed #
We’ve put together this guide to make your Openserve Fibre installation process as smooth as possible.
This guide includes a lot of information, with some important things for you to do, and think about. We feel that you should rather have too much info than too little at this point. Please make sure to read the points at the end.
⚙️ Routers and settings #
You can also use your own router and configure it yourself – just make sure it is set to PPPoE with the details we provide you. We have most router settings on this page of our website: https://www.atomic.co.za/docs/router-settings/.
If you ordered a router from Atomic, we’ll arrange to configure it and deliver it.
🔋 Power for devices #
You will need two 2-point power plugs:
- One is for the ONT device that Openserve will install (Optical Network Terminal, equivalent to a fibre modem).
- The other is for your WiFi router.
- You can also power the ONT and router with a 12V DC-UPS.
👷♂️ The Install #
- The fibre installation is something the Fibre Network Operator (FNO), Openserve, handles (not Atomic).
- While the FNO do many of the installs themselves, they also contract some of the work out to third-party contractors.
- You can ask for identification if you want to be sure the team that arrives is from the fibre company.
- Openserve will contact you directly to schedule the install and will use a combination of calls and SMS.
- Worth noting that the teams coming into your home are doing so for the first time, so it is your responsibility to point out hazards and areas you don’t want them to run fibre.
- Depending on your installation difficulty, they will likely be drilling into/through walls, and this means you will need to advise if there are any water mains pipes, electric cables or other hazards where the drilling will take place.
- Outside your property boundary, Openserve provides the trenching and conduits.
- Inside your property boundary, Openserve generally covers the full costs from the boundary wall to the home, including trenching.
- Openserve will endeavour to restore the garden to its original state.
- The first 8 meters (inside the home or office) is covered by the standard installation fee. Any extra distance can be provided at R184 /m. Extra costs will be quoted and billed by Openserve or its 3rd party contractors.
- In some instances, your fibre might be installed from a telephone pole: Aerial Fibre.
- If you do not want surface mounting or it is technically not possible to do the installation by following a surface mounting route, you will have to provide your own pipes or ducts.
- If you have existing conduits you would like them to use, these need to be in an excellent state of repair, with no gaps or holes and have a drawstring to pull the fibre cable through. If your conduit is damaged or does not have a drawstring, it cannot be used.
- If your fibre cabling needs to run outdoors or through a garden, the technicians will usually install (PVC) pipes to protect and route the cable. Make sure they are deep enough or in a location where they are not likely to get damaged by future garden work.
- NB: If you have any issues with the installation taking place, please raise this with the installation team during the installation (if possible), as they are most likely able to deal with your issues then (and to get them to come back in a timely manner can be a challenge).
🎯 Tips and tricks #
- Choose Your Router Location Wisely: Install it near a power outlet, where it’s easy to view the status lights on your fibre box and router.
- Plan Your Cabling Route: Clearly communicate where you want cables to run and boxes mounted on your walls. Specify your aesthetic preferences, including whether you want any components concealed. Be precise, as cables and boxes are fixed once installed.
- Special Requests Require Advance Planning: Standard installations are designed to be completed in under two hours. If you have unique requirements, discuss them with us beforehand, as they may fall outside the scope of a typical installation.
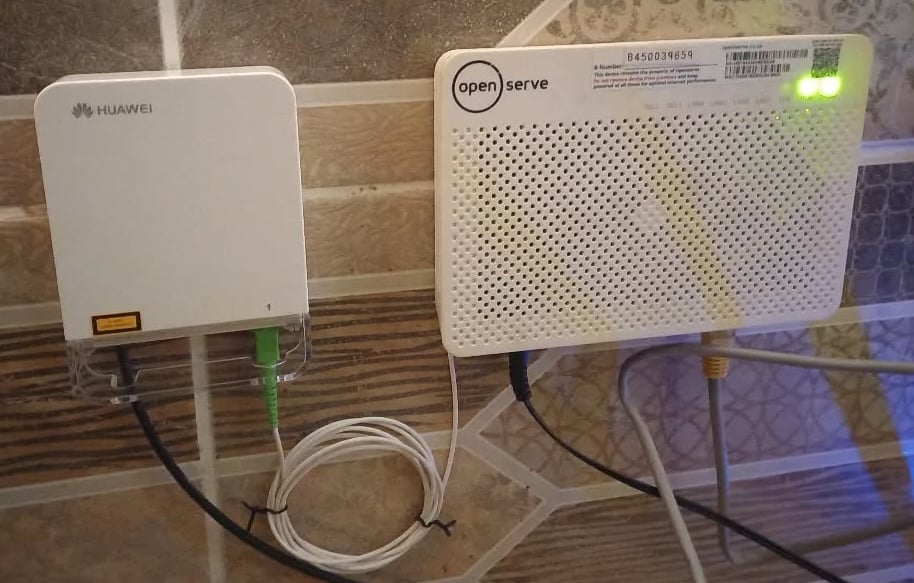
📸 Installation Examples #
Here is an example of what an Openserve installation will look like when completed. The white box on the right is the ONT. The ONT and your WiFi router will require two available plugs and must be close to each other. You can also power the ONT and router with a 12V DC-UPS.
🚦 Going live after installation #
- In most cases, the fibre network will make the line live 1-2 hours after installation.
- If it’s a pre-live area, it can take a few days to go live.
- You will receive an email and SMS the moment your fibre service is activated.
⚠️ Key points #
- Please ensure you are at home during the installation. An adult needs to be at home to instruct the installers and also sign for completion.
- You will need two free 2-point power plugs or a 12V DC-UPS power near the fibre box location.
- Place the fibre box (ONT/CPE) in an area where you can easily access it to reboot it.
- Do NOT hide your WiFi router in a cupboard. If you need an ‘aesthetically pleasing’ router, we can suggest a few models with different designs.
- Ask the installation team to show you your signal level on the fibre signal meter. A range between -18 and -26 is healthy. -27 and lower can cause problems. If you have a gigabit service, you want -25 or better.
- Once you sign the fibre network job completion form, there will be extra costs to get a team out again, so make sure you are happy with the work before they leave.
- The fibre equipment remains the property of the fibre network. Damage or loss will result in replacement costs.
- Billing starts once your service is live. You will get your invoice via email at the end of your first month. Any partial month will be billed pro rata from the day after you are activated.